Quantum Programming Framework: Qiskit

Quantum Programming Frameworks
Quantum programming frameworks serve as a critical bridge between the abstract quantum circuit designs we write (e.g., in OpenQASM) and their execution on quantum hardware or simulators. These frameworks provide a high-level API to interact with quantum systems, offering tools for circuit design, simulation, and execution.
Among the various quantum programming frameworks available today, such as Google’s Cirq and Microsoft’s Q#, Qiskit has emerged as a popular choice for quantum programming. Developed by IBM, Qiskit is an open-source framework that provides a Python API for quantum computing. It allows users to design, simulate, and run quantum circuits on IBM’s quantum devices or simulators.
Qiskit seamlessly integrates with OpenQASM, making it easy to work with quantum circuits written in OpenQASM. While OpenQASM serves as the standard for describing quantum circuits, Qiskit enhances the flexibility by offering a Python API for building and executing these circuits programmatically. In this tutorial, we’ll explore how to use Qiskit to parse and simulate OpenQASM code, and then replicate the same circuit using Qiskit’s Python API.
Simple Qiskit Tutorial
In this tutorial, we’ll walk through a simple example using Qiskit to parse and simulate OpenQASM code, and then replicate the same circuit using Qiskit’s Python API. All the code snippets are available and executable in this Google Colab Notebook. You can try this tutorial in your browser without installing anything. Or, you can try this tutorial on your local machine by following the instructions below.
0. Installing Qiskit
Before we start, install Qiskit and its Aer simulator package, which allows us to simulate quantum circuits on a classical computer. You can install Qiskit and Aer using pip:
$ pip install qiskit qiskit-aer
1. Writing and Parsing OpenQASM Code
Let’s start by defining a simple quantum circuit using OpenQASM. Here’s the example circuit we used in the previous article:
OPENQASM 2.0;
include "qelib1.inc";
qreg q[2];
creg c[2];
h q[0];
cx q[0], q[1];
measure q -> c;
Note that we’re using the h and cx gates from the qelib1.inc library. This
built-in library provides standard quantum gates like Hadamard and CNOT gates.
Prepare the OpenQASM code as a string (by reading from a file or directly writing it in the code or any other way you prefer) in Python. Using Qiskit, we can parse the OpenQASM code and construct a quantum circuit object from it.
from qiskit.qasm2 import loads

qasm_circuit = loads(qasm_code)
print(qasm_circuit.draw())
The loads function parses the OpenQASM code and returns a QuantumCircuit
object, bridging the gap between text-based circuit descriptions and programmatic
circuit manipulation. The resulting QuantumCircuit object can be visualized
using the draw method:
     ┌───┐     ┌─┐
q_0: ┤ H ├──■──┤M├───
     └───┘┌─┴─┐└╥┘┌─┐
q_1: ─────┤ X ├─╫─┤M├
          └───┘ ║ └╥┘
c: 2/═══════════╩══╩═
                0  1
This confirms the parsed circuit matches the one we defined in OpenQASM.
2. Simulating the Circuit
To simulate this circuit, we use Qiskit’s Aer simulator, which acts as a backend for running quantum circuits:
from qiskit_aer import AerSimulator
from qiskit.visualization import plot_histogram

simulator = AerSimulator()

# Simulate the circuit with 1024 shots (repetitions)
qasm_result = simulator.run(qasm_circuit, shots=1024).result()

# Retrieve and plot the measurement results
qasm_counts = qasm_result.get_counts()
plot_histogram(qasm_counts, title="OpenQASM Circuit Results")
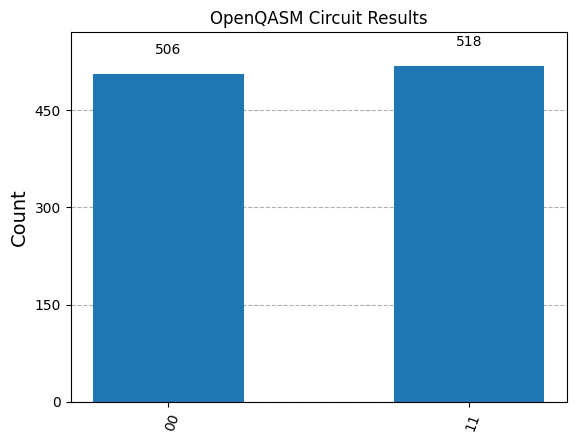
The output histogram will show two possible outcomes: 00 and 11, with
roughly equal probabilities. This is expected since the circuit applies a
Hadamard gate to the first qubit
entangles the two qubits with a CNOT gate
\[\frac{1}{\sqrt{2}}(\ket{00} + \ket{10}) \xrightarrow{\text{CNOT}} \frac{1}{\sqrt{2}}(\ket{00} + \ket{11}),\]and then measures the qubits. The entanglement ensures the qubits are in a superposition of $\ket{00}$ and $\ket{11}$ states.
Due to the probabilistic nature of quantum measurements, the results may vary
slightly each time you run the simulation. However, the overall distribution
should remain consistent. For example, we ran the simulation with 1024 shots,
which means the expected counts for 00 and 11 are around 512 each, which
should be reflected in the histogram:

Note that, the simulation is possible because the circuit is relatively small; for larger circuits, the simulation becomes infeasible due to the exponential growth of quantum states. That’s where quantum hardware comes into play.
3. Building the Circuit with Qiskit in Python
Now that we’ve explored the simulation with OpenQASM, let’s see how to achieve the same result using Qiskit’s Python API.
from qiskit import QuantumCircuit

python_circuit = QuantumCircuit(2, 2)
python_circuit.h(0)  # Apply Hadamard gate to the first qubit
python_circuit.cx(0, 1)  # Apply CNOT gate
python_circuit.measure([0, 1], [0, 1])  # Measure both qubits

print(python_circuit.draw())
The Python API provides an intuitive way to build circuits step by step, allowing for more dynamic and flexible programming. The resulting circuit should match identical to the one written in OpenQASM:
We can simulate the Python-constructed circuit using the same Aer simulator:
qasm_result = simulator.run(python_circuit, shots=1024).result()

qasm_counts = qasm_result.get_counts()
plot_histogram(qasm_counts, title="Python Circuit Results")
Again, the histogram will show the same results as the OpenQASM circuit with
roughly equal probabilities for 00 and 11 outcomes, confirming that both
approaches produce the same output.
What’s Next?
In this tutorial, we explored how Qiskit bridges the gap between OpenQASM and Python, making it possible to describe, simulate, and program quantum circuits effectively. But Qiskit is more than just a simulator—it’s a comprehensive framework that allows users to run quantum programs on real hardware, analyze complex algorithms, and even delve into optimization and machine learning.
In the next article, we’ll leverage Qiskit’s power to implement Shor’s algorithm for solving real-world cryptographic problems, like the elliptic curve discrete logarithm problem (ECDLP). This will give you a glimpse of how quantum computing may revolutionize fields like cryptography.
All images in this article were generated by the author, except those explicitly marked with a source link.

Leave a comment